Pack your carry‑on to fit the 22 × 14 × 9‑inch limit, keep it light, and place liquids in a clear quart‑size bag; use a personal item under 18 × 14 × 8 inches so everything fits without repacking. Enroll in TSA PreCheck, Global Entry, or CLEAR to keep shoes, belt, and jacket on and speed through ID checks. Choose the lane that matches your enrollment and airport, and keep your REAL ID‑compliant ID and boarding pass ready. Arrange shoes, laptops, liquids, and accessories in separate bins, using clear shoe bags and a flat laptop tray. Follow these steps and you’ll shave minutes off the process, and the next section shows how to handle alarms and secondary screening.
TLDR
- Enroll in TSA PreCheck, Global Entry, or CLEAR and keep enrollment cards handy to use dedicated fast lanes.
- Pack a carry‑on that meets the 45‑inch linear rule and keep it under 35 lb; store liquids in a clear quart‑size bag and place toiletries up front.
- Use a personal item ≤ 18 × 14 × 8 inches that fits under the seat, and organize shoes, laptops, and accessories for one‑motion bin placement.
- Have a REAL‑ID‑compliant ID and boarding pass ready; ensure names match exactly to avoid additional checks.
- Choose the lane that matches your enrollment and airport, and combine CLEAR with PreCheck for the quickest passage.
Pack Your Bag for Speed: Light, TSA‑Ready Organization

How can you streamline security when you’re already rushing through the airport? Pack a bag that fits the 22 × 14 × 9‑inch limit, or the carrier’s 45‑inch linear rule, and keep it light—most airlines cap carry‑on weight at 35 lb. Use a clear quart‑size bag for 3.4‑ounce liquids, place toiletries up front, and label items. A personal item under 18 × 14 × 8 inches fits under the seat, freeing overhead space. Remember that TSA focuses on contents, not bag dimensions. Consider storing liquids in a durable quart-sized bag with sealed seams to prevent leaks and speed screening.
Enroll in Fast‑Track Programs for Airport Security
Want to cut your wait time at security? Enroll in TSA PreCheck, Global Entry, CLEAR, NEXUS, or SENTRI. Pre‑Check costs $76–$85 for five years, lets you keep shoes, belt, and jacket on, and speeds domestic lines. Global Entry adds $120 for five years, includes Pre‑Check, and speeds customs. CLEAR uses biometrics to bypass ID checks. Apply online, then visit a fingerprint center. Memberships last five years and save time on three or more annual trips. Some frequent travelers also consider enrolling in Global Entry because it combines customs benefits with Pre‑Check for broader international and domestic savings.
Choose the Right Line for Airport Security

After you’ve signed up for a fast‑track program, the next step is picking the lane that will actually save you time. Choose TSA PreCheck for shoes‑on, quick 7‑minute screens, or combine CLEAR’s biometric escort with PreCheck for the fastest passage. Premium or elite lines may look short but still funnel into general screening, while standard lines often exceed 30 minutes. Use the lane that matches your enrollment and airport. Many travelers combine fast‑track programs with efficient transit networks in compact cities to minimize overall travel time.
Show Your ID and Boarding Pass Without a Hitch
Ever wonder why a smooth ID check feels like a breeze? Keep your REAL ID‑compliant driver’s license, passport, or military ID ready, and make sure the name matches your boarding pass exactly.
If you lack a REAL ID, pay the $45 ConfirmID fee online, bring the receipt, and arrive early.
Present both ID and digital or printed boarding pass at the officer’s station for a quick, hassle‑free verification. Compression socks with 20–30 mmHg can help reduce swelling on long flights and improve circulation.
Place Shoes, Laptops, Liquids, and Accessories in Bins Efficiently
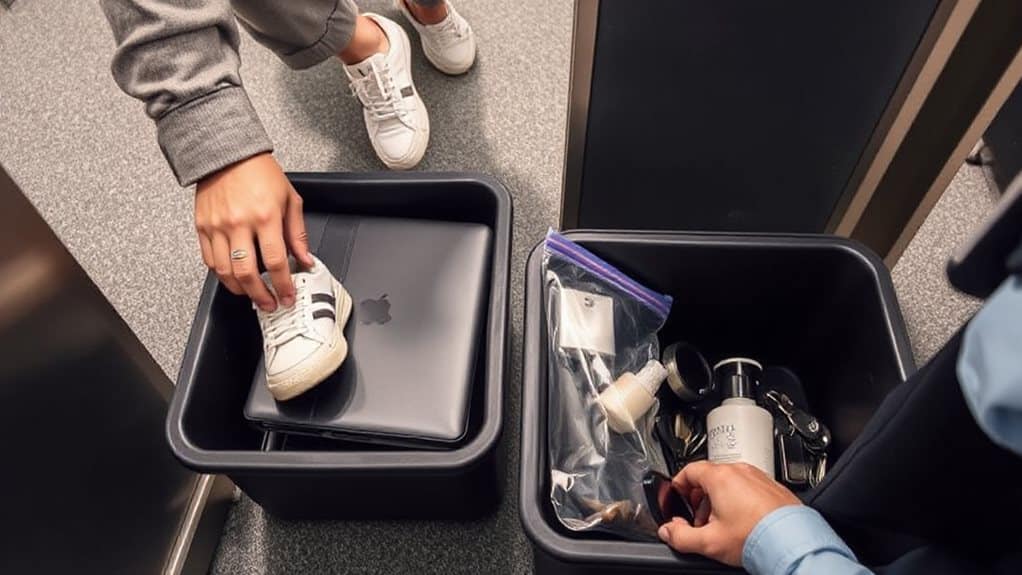
How can you streamline the bin‑loading process so you spend seconds, not minutes, at the security checkpoint?
Place shoes in a single layer, side‑by‑side, to avoid stacking.
Slide laptops into a clear tray, keeping them flat.
Pack liquids in a zip‑top pouch, then set the pouch upright.
Group watches, belts, and small accessories together, then drop everything into the bin in one smooth motion.
For organized footwear and quick identification, place shoes in clear or semi‑transparent bags before loading them into bins.
Navigate the TSA Scanner and Handle Alarms
When the scanner alarm sounds, respond promptly by stepping aside and listening to the officer’s instructions; this keeps the line moving and prevents bottlenecks.
You’ll likely be asked to place the flagged items in a new bin for a quick re‑scan, so keep your belongings organized and ready to transfer.
A calm, efficient re‑scan and any follow‑up checks will get you back on the line without unnecessary delays.
Consider enrolling in TSA PreCheck to reduce the chance of additional screening and speed your overall airport experience.
Alarm Respond Promptly
Why do alarms pop up so often at the TSA scanner? Perspiration, clothing folds, and movement trigger false alerts, while orthopedic implants cause nearly half of the alarms. When a beep sounds, stay calm, follow the officer’s directions, and keep your items accessible. Explain any implants or metal objects quickly; staff will verify and clear you, minimizing delays and preserving your freedom to travel.
Bin Re‑Scan Efficiently
Alarms at the scanner often stem from sweat, folds, or movement, and orthopedic implants trigger nearly half of them.
Align your feet to the yellow footprints, raise your hands to match the decal, and place your laptop flat in its own bin.
Use packing cubes, keep liquids on top, and choose a far lane.
Follow the agent’s instructions precisely to avoid delays.
Collect Items, Pass Secondary Screening, and Reach Your Gate

What you need to do before you even step onto the conveyor belt is gather every item that will go through the X‑ray and keep your documents within arm’s reach. Empty pockets, remove shoes, belts, jackets, and place phones, wallets, and keys in bins. Scan your boarding pass and ID, then walk through the detector. If selected for secondary screening, raise arms, allow wand or pat‑down, and keep your bag open for inspection. Retrieve items quickly, follow gate signs, and use PreCheck or CLEAR for faster access.
And Finally
By following these steps, you’ll move through airport security faster and with fewer hiccups. Pack light, organize items for TSA inspection, and keep your ID and boarding pass ready. Choose the appropriate line, place shoes, laptops, liquids, and accessories efficiently, and respond promptly to any scanner alerts. After clearing the primary checkpoint, collect your belongings, complete any secondary screening, and head straight to your gate. This systematic approach minimizes delays and keeps you on schedule.


